
Have you pulled your back so badly that you can hardly breathe? Been there.
It was a matter of seconds. Having just woken up, I leaned sideways to reach for a book and a moment later I was stuck half off the bed, gasping for air. Shooting pain in one side of my lower back prevented me from moving. For a brief moment the shock made me fear I was paralysed. Unable to go back to an upright position, I lowered myself to the floor, face down, my mind racing about what to do next.
Luckily a friend was nearby and came to my rescue by handing over some over the counter anti-inflammatory medication. I don’t normally go down the pain killer route but it is undeniable that, during those first few hours, they took the edge off enough to allow me to think a bit more clearly about how to manage my back next.
1. Rest / Yoga Nidra
Lower back strain (or “pulled back”) is one of the most common problems I see in my clinic. The initial stages of back strain can be quite scary due to the acute nature of the pain and not being able to stand. While it might seem that, at this point, there isn’t much that can be done, the truth is that there is plenty you can do to heal more quickly. Following is how I approached those days of acute pain which contributed to what turned out to be a rather speedy recovery. In less than two weeks I was back to being able to carry out most activities without discomfort.
The idea of resting completely can be a difficult one and certainly one that I struggled with. Apart from the usual life commitments, as a self employed person I had to cancel clients which meant loss of income, ouch.
In the initial stages of acute pain, your nervous system is dealing with a lot, so you want to create the best possible environment for it to settle and readjust. Giving your body some time to recuperate properly, instead of soldiering through pain, will pay off in the long term and speed up recovery.
During the first couple of days I practiced a lot of yoga nidra which is a form of guided relaxation. All you need to do is find a comfortable position for your body to be for the length of 20 minutes. You can find many free ones here.
2. Rocking it Baby
This was one of the first movements I instinctively made as soon as I managed to lower myself on the floor. Part of me was relieved that there was a range of motion that I could still control. Another part was simply soothed by this movement; most of us can relate to memories of being lulled as kids. Later, I found out that there have been several studies into the health benefits of rocking. Rocking is also used in bodywork to release tension & stagnation and a technique I often use during treatments.
From a Chinese medicine point of view some (even if very small) movement in your body prevents your qi (or prana) from stagnating in the affected area and causing more pain. The way I rocked is very simple: lie on the floor, prone (face down), head on your hands and start the rocking from the pelvis, letting it ripple as far as you can up and down the body especially in the lower back area.
3. Restorative yoga & breath work
From the second day I attempted a few simple yoga postures; some of the shapes & movements described below became more available as the days passed. If you are injured, just move to the point that you are comfortable with but before it hurts. Once in the posture I tried to relax as much as possible with little effort, using as much support/ props as needed to make my body feel at ease. And once comfortable, I tried to take the breath into my back and especially where the most discomfort was. When we are in pain there is a tendency on wanting to avoid the painful area. Using the breath can be a gentle type of exploration which also soothes the nervous system.
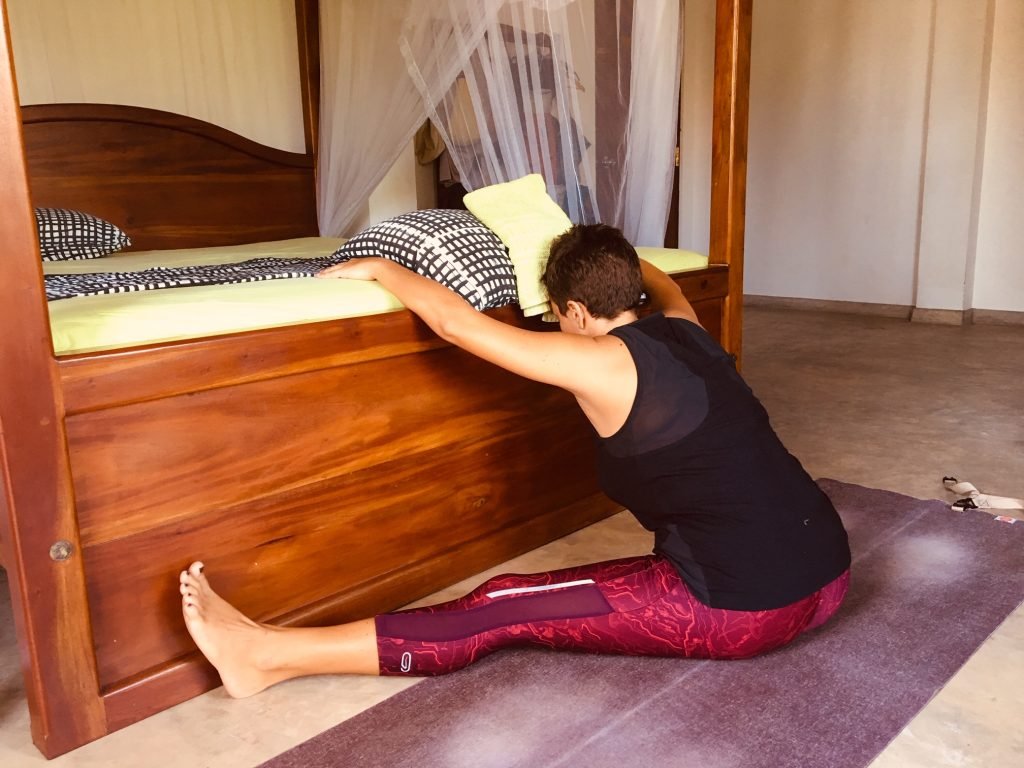
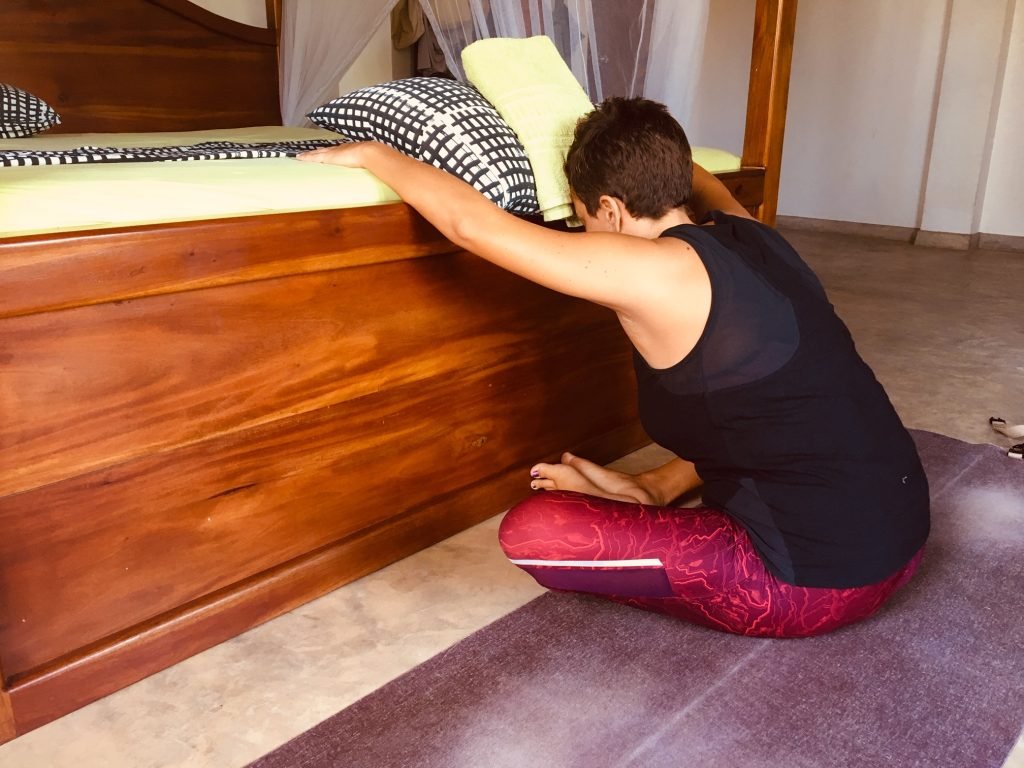
FORWARD FOLD & BUTTERFLY
- Both variations are the same movement when it comes to the pelvis and spine. The different position of the legs mean that you will feel the stretch more in the hamstrings or groin. •Better to use a bed/ surface that you can slide your feet under unlike in the pics (it was the best angle for lighting).
- Find a seated position where your pelvis can tilt forward. If the back of your legs are tight feel free to bend the knees a little or put some folded blankets underneath them. You want to rest your upper body and head on something (bed, bolsters, pillows) and feel a lengthening and spaciousness in the spine.
- The idea is not to chase strong sensations but more about finding a position that is comfortable & where you can breath in your lower back.
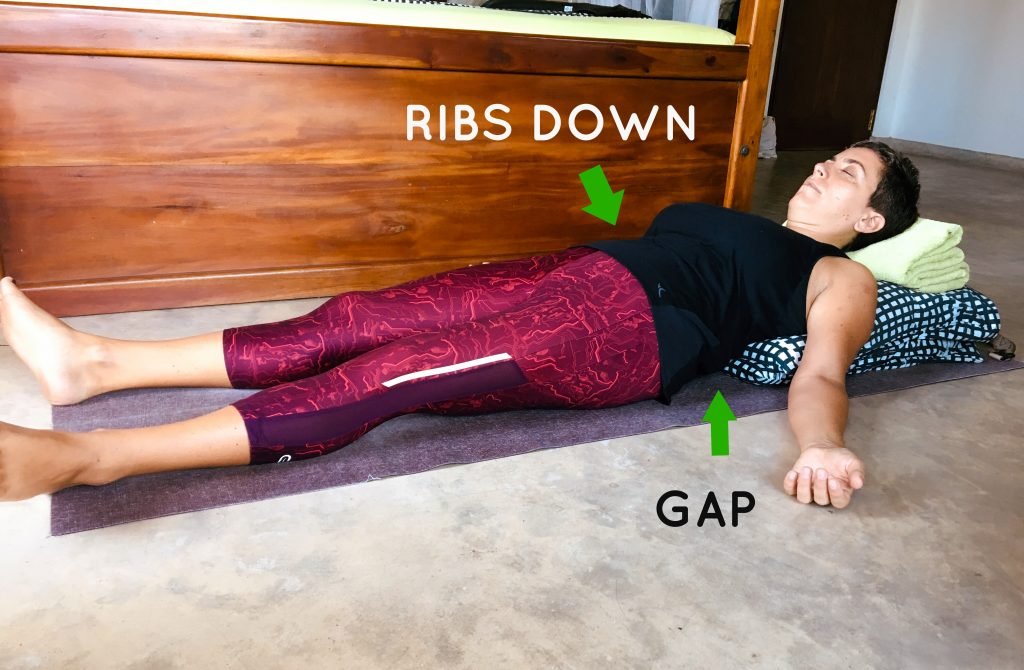
RECLINED PSOAS RELEASE
- One my favourite postures to practice yoga nidra. Use a bolster (or pillows) for your back and something else to elevate your head. Position yourself so that when you lie on the bolster, the middle of your back in contact with the bolster. This means that there will be a gap between the bolster and the buttocks. This is not a backbend; what you want is to relax your ribs down towards the floor.
- This is not only a very relaxing posture but it can also help with tight psoas and the tendency for flaring our ribcage, one of the reasons for lower back pain.
PELVIC TILTS
- Sitting with legs in front of you, place your hands behind your back, away from your hips enough to support your back. Fingers are pointing in any direction that feels better. Start tilting your pelvis back and forth (tucking & untucking the tailbone) and see how that feels in your lower back. I found this was one of the first movements I could introduce in my lower back. Nowadays we tend to spend a lot of time sitting down which freezes our pelvis in what is called a posterior tuck . This movement can slowly retrain your pelvis to move to its full range of movement which will also benefit your lower back.
- If you find it too tiring for your arms, struggle to keep your spine straight or in too much pain, exploring lying on your back with knees bent is a great alternative.
CAT/ COW
You are probably familiar with this as it’s taught in most yoga classes. However if you have lower back pain, chances are that you can only do it at a very slow pace and possibly without any big movements. That is good news! I encourage you here to take it as slowly as you can possibly bear it and concentrate on feeling the individual vertebra rather than worrying on how round or concave your spine is. You will become aware of blind spots in your body which in turn will make your back move more efficiently and less prone to injury.
- On your hands and knees, find a neutral position of your spine. To do that, do the pelvic tilts as in the exercise before and see if you can find a position where your pelvis feels like it is not tucked under nor tipping forward. Notice how that feels.
- Keeping the neck long (look down), start tucking the tailbone under and round the spine one vertebra at the time, finally tuck the chin in and the head under. Go in the opposite direction starting from the pelvis… untuck it and one vertebra at the time the abdomen lowers towards the mat, the head and neck are the last to lift up.
- It might take a long time to feel the different parts of the spine without some other part compensating for… but keep trying. This is one of the best things you can do for your spine and your back will thank you for it.
ACTIVE SPHINX
- Start on your belly and come onto your forearms. If your injury is quite recent you might want to have your elbows a bit forward and not directly under the shoulders (as in the traditional pose) to turn down some intensity. The palms can face down or up (more intense). Press the pelvis into the floor and lengthen the tailbone towards the heels.
- As you inhale, feel a lengthening through the crown of the head and as you exhale, tuck the chin, press firmly into the forearms and gently round the spine and look at your belly. Inhale slowly go back to the starting position.
- At the beginning keep the movement small and with time as you exhale you can work towards lifting the pelvis off the floor and look at your knees (the version demonstrated in the video below might not be available to you if you are still recovering…be patient and work within your level of comfort).
- This movement helps you strengthening your deeper abdominal muscles and therefore supporting your lower back.
4. Get treatment
For the first couple of days the idea of someone massaging my painful lower back was not appealing. Luckily the other acupuncturist in the house joined me, so I had a few daily sessions. The great thing about acupuncture is that you can receive an effective treatment without needling the local area so you are good to go as soon as you can make it to your acupuncturist.
A few days in, I found a local therapist with a special interest in back care and booked for a therapeutic massage which not only helps with promoting the blood circulation and therefore healing of the area but also acts as a down regulator for the nervous system.
FINAL THOUGHTS
Go and see your doctor. I didn’t because I had enough information and knowledge to be pretty sure that nothing more serious was going on. And I had enough clinical experience to know what to expect. But if you don’t and are in doubt, just go.
I took over the counter painkillers straightaway and for another couple of days to help with basic daily activities and get some (poor) sleep. On the third day I felt my body (and mind) could deal without. I also wanted to gage with what I could and couldn’t do in terms of pain and therefore stopped. So I am not suggesting you take any medications, see what works for you.
and finally…
Do your best to get to the why of your pain:
Pain is often multi factorial and not easily understood (especially when chronic). All the above certainly helped in the acute stage of pain and maintenance of a healthy back afterwards but it would not necessarily address the deeper roots of the pain.
In my case I have a pretty good idea of what happened. My back was exposed to a cold damp environment during my sleep when the heating decided to break down that night (it was late October). So imagine my back like a damp, frozen cloth. I matched that with a sudden movement as soon as I woke up. I was also tired, overworked and had been doing more lifting than normal in the month prior. Oh and I had recently got married. The cherry on the cake was a castor oil detox I did the day before… I think the last few points deserve their own blog posts!
In your case it could be many other reasons: sedentary lifestyle, wrong shoes, a toxic relationship, not enough variety in movement…the list continues. But until you figure that out… you might just be patching things up. And going to the bottom of lower back pain will most certainly have positive ripple effect on other aspects of your health.
Giusi
PS. We will be recording a 20 mins yoga class for a healthy back…sign up to know when it is ready!
Featured image by Melissa O’Donohue on Foter.com / CC BY-ND